


Do you want to know how to outline image and make your photos pop? Adding an outline to your images can be tricky, especially for those new to photo editing. But don’t worry, as this article will show just how easy it can be. We show the steps here and give you a tool that makes the process simple.
Be it to apply a sleek, minimalist effect or to make the subject of your photo stand out, here you’ll find some useful tips and an easy-to-operate picture outline maker for that. By the end of this article, you’ll have stunning outlined photos in no time.
OK, let’s get started.
Part 1: Why Add Outlines to Photos?
Before getting straight to how to create a photo outline, it’s important first to understand why you need to add an outline to photos. Well, here are the main benefits of adding outlines to your photos:
- Making the Subject Stand Out: Outlining makes the subject stand out by making it more striking and noticeable within the frame.
- Letting the Outlines Create a Clean, Organized Look: Outlines provide structure in the photo, drawing the subject out of a busy or cluttered background.
- Add a Minimalist Catching Style:Outlines minimize the image, making it very modern and sharp in vision without overpowering the subject—an effect that can be easily achieved using an AI image generator.
- Improved Focus: Outlines provide a greater focus for the viewer by making them pay attention to the most important part of the photo, be it a person, an object, or some kind of detail.
- Aesthetic Enhancement: Providing an outline to the photo brings a new and different touch, enhancing the style of your photo, hence making it stand out amongst various others.
Part 2. Free Photo Editing Tool— insMind
For adding outlines to your photos, one of the best free tools is insMind’s AI photo editor. This AI-driven web tool is fast, user-friendly, and opens directly in your browser without requiring advanced software or installs.
From highlighting a product, enhancing a social media profile picture, or creating attention-grabbing designs for your business, insMind’s tool makes the process effortless.
What really makes insMind stand out is that it immediately starts by sizing up the background and readying it for removal, adding an instantaneous, sharp, professional-looking outline pictures. You can upload your image and then directly adjust outline style, color, and thickness before downloading your enhanced image, all with just a few clicks.
This image outliner is ideal for those who want professional-grade outlines without the steep learning curve of traditional editing software.
Part 3. Step-by-Step Guide to Applying Picture Outline Maker with insMind
Creating an outlined image with insMind’s Picture Outline Maker is quick and easy. Follow the given steps to get started with this image outline generator:
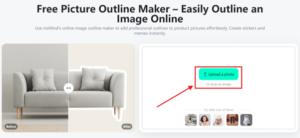
Step 1: Access the Picture Outline Maker Page
First, open your web browser and visit the insMind Picture Outline Maker. This link will take you directly to the tool where you can start editing your image.

Step 2: Upload Your Photo
On this page, you will find the option to upload your photo. Hit “Upload” and follow through on your computer or device to select the image you want to work on. Make sure it’s a clear image quality for best results.
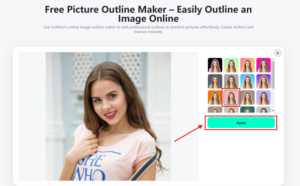
Step 3: Generate Image Outline
Immediately after having uploaded the photo, generate the outline by selecting the style. The AI will automatically detect edges of the subject in your photo and create a clean outline according to the style you choose. You can always preview this result right away, see how it would look; if satisfied, you always go ahead with further customization.
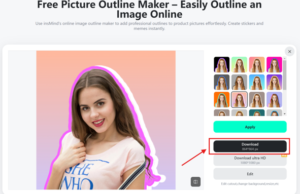
Step 4: Download or Edit Your Image
Once the outline is generated, further modification can be done: thickness, color, style to your preference. Click the “Download” button if this is what you want for your outlined picture. You can make more edits if you would like to before downloading.
Using these four steps, you can generate professionally outlined images with the help of insMind’s Picture Outline Maker!
Part 4. Tips for Achieving the Perfect Outline
With these following practical tips, your outline pictures can look professional and polished:
1. Choose the Right Photo
The quality of the original image plays a big role in the final result. For the best outlines, select high-resolution photos featuring clear edges and minimal clutter. Images with high contrast between the subject and the background tend to work best because the outline tool will have an easier time distinguishing between the two.
1. Adjust Line Thickness
It may make much of a difference depending on what you want to achieve. You would want it bolder if the subject has to stand out, while it should be thinner for a more subtle look at the outline. insMind enables one to play with line thickness; hence, try different settings until that setting is reached that balances your needs.
1. Select the Right Outline Color
The color of an outline can completely change an image’s mood. Black or white will suffice for high-contrast visuals and has the effect of popping the subject out, while if one wants a more creative look or softer, he has to choose a color that goes with the picture. Use colors from the tone of the subjects or complementary colors matching well with the background to bring harmony into your piece.
1. Consider the Style of the Outline
InS Mind will provide the outline in different fashions from complete to dashes/dots. It fully depends on the feeling you would want to create on the image. Thus, full outline gives an image a clean professional look, whereas the dashed or dotted lines make it more playful and artistic. You can experiment to see which of these provisions will fit your image best.
1. Refine the Details
After outlining the image, go over it again to refine it. You can further refine an outline by adjusting its color or thickness or by adding special effects such as shadow or glow. That little touch will make all the difference in how your outlined image comes out: polished and striking.
By following these tips, you can easily enhance your images with beautiful outlines that grab attention and make your photos stand out.
Conclusion
Creating striking outline image can be cumbersome and really time-consuming. What you can do with In Mind’s Picture Outline Maker is add good-looking outlines to images in just a few clicks. Be it making your subject pop in the image, giving it a minimalist look, or simply enhancing the photo, this tool offers all features necessary without any complicated usage.
From quick background removal to customizable outline styles, colors, and thickness, insMind makes it as user-friendly as possible.
Why wait? Dive into the Picture Outline Maker developed by insMind today and begin transforming your photos in a flash. And guess what? It’s absolutely free. Try it out now and see the difference.